 On Moment In Time
A leckét Cida engedélyével forditom.
Az eredeti Lecke a Psp 2020 Programmal készült.
Én a Corel X6 Programmal készitettem
Anyag:
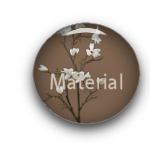
1 Tube Personagem ŕ sua escolha
1 Tube Decorativo Flor ŕ sua escolha
titulo_one_moment_in_time_byCidaBen
Pluginok:
Mehdi > Wavy Lab1.1
Filters Unlimited 2.0 > Buttons & Frames > Glass Frame 3
MuRa's Meister > Perspective Tiling
AAA Framess > Foto Frame
1.Lépés
Szinek Kodok
Foreground: #55423b
Background: #f5efdf
Szin 3: #996b51
Szin 4: #cfcecf

2.Lépés
Megnyitunk egy 900x500 px lapot
Effects—Plugins
Mehdi---Wavy Lab 1.1
Linear, 3,0,0
Szinek 3, 4,1,2

3.Lépés
Layers---Duplicate
Selections…Select All
Edit Copy a Tube Personagem Tubust
Edit,,, Paste Into Selection.
Selections… Select None
4.Lépés
Adjust…Blur…Gaussian Blur…Radius: 15
5.Lépés
Effects…Texture Effects…Blinds.. #55423b (Foreground)
6.Lépés
Effects…Geometric Effects… Skew

7.Lépés
Effects > 3D Effects > Drop Shadow: 0 > 0 > 50 > 20 > Color #55423b (Foreground)
8.Lépés
Effects > Plugins > Filters Unlimited 2.0 > Buttons & Frames > Glass Frame 3

9.Lépés
Effects > Distortion Effects > Pinch
10.Lépés
Effects > Distortion Effects > Wave
11Lépés
Layers > Duplicate
Image > Mirror > Mirror Horizontal
Layers > Properties > Blend mode: Hard Light > Opacity: 100.
Layers > Merge > Merge Down
12.Lépés
Layers > New Raster Layer
Kiöntjük #f5efdf szinnel
13Lépés
Layers > New Mask Layer > From Image: Narah Mask_0948
.
Layers > Merge > Merge Group.
Effects > 3D Effects >
Drop Shadow : 0 > 0 > 100 > 40 > Color: (#000000)
Layers > Duplicate.
Image > Mirror > Mirror Vertical.
Layers > Merge > Merge Down.
Layers > Arrange > Move Down.
Adjust > Sharpness > Sharpen.
14.Lépés
Ativald a Raster 1.
Layers > Duplicate.
Layers > Arrange > Bring to Top
15.Lépés
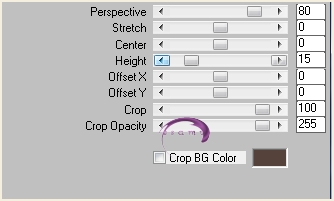
Effects > Plugins > MuRa's Meister >
Perspective Tiling:
16.Lépés
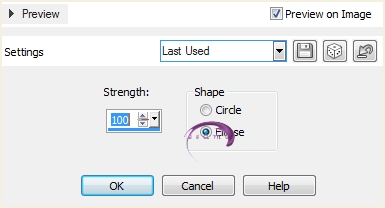
Effects > Geometric Effects > Spherize.
17.Lépés
Layers > Properties > Blend mode: Luminance (L) > Opacity: 100.
Effects > 3D Effects > Drop Shadow: 0 > 0 > 50 > 20 > Color: (#000000)
Adjust > Sharpness > Sharpen
18.Lépés
Edit > Copy > a Tube Decorativo Flor.Tubet
Edit Paste As New Layer.
Image..Resize

Pick tool huzd jobbra ahogy a képen látod.
Layers,,Arange Move Down
19.Lépés
Aktiváld a Felsö réteget
20.Lépés
Edit > Copy > a titulo_one_moment_in_time_byCidaBen.
Edit > Paste As New Layer
.
Pick Tool: Position X: 19, Position Y: 36

Adjust Sharpen
20.Lépés
Edit > Copy Tube Personagem.
Edit > Paste As New Layer.
Helyezd a kép közepére.
Image..Resize .
21.Lépés
Image > Add Borders > Symmetric:
1px - Foreground
2px - Background
1px – Foreground
22.Lépés
Edit > Copy.
Selections > Select All.
Image > Add Borders > Symmetric: 50px bármilyen szinn.
Selections > Invert.
Edit > Paste Into Selection.
23.Lépés
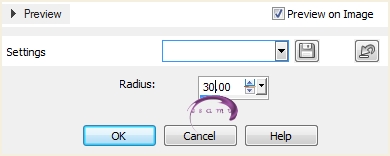
Adjust > Blur > Gaussian Blur: Radius 30
Selections > Invert.
Effects > 3D Effects >
Drop Shadow: 0, 0, 100, 50, Color: #55423b (Foreground)
Edit > Repeat Drop Shadow.
Selections > Select None
24.Lépés
Effects > Plugins > AAA Frames > Foto Frame

Uj rétegre a neved. Layers- Merge All (Flatten)
File > Export > JPEG Optimizer

![]()

 eddatutorials 2023
All Rights Reserved
Designed and Maintained by Etelka Samu
eddatutorials 2023
All Rights Reserved
Designed and Maintained by Etelka Samu
| | | | |